Friday, November 30, 2018

Black + Decker Classic Steam Iron

I often recommend products I use but don't always tell you about my experience. My recent iron purchase is something I want to share. I've never owned a fancy, quilting-specific iron. There are fancy irons that cost more than $100 and steam pressed that cost more than twice that. I don't need an iron that does tricks. Well, not many. I do have a Panasonic Cordless Iron (less than $100) because I had used a friend's and sometimes even I need a cordless iron. I also have the Steamfast Mini Travel Steam Iron for travel. 

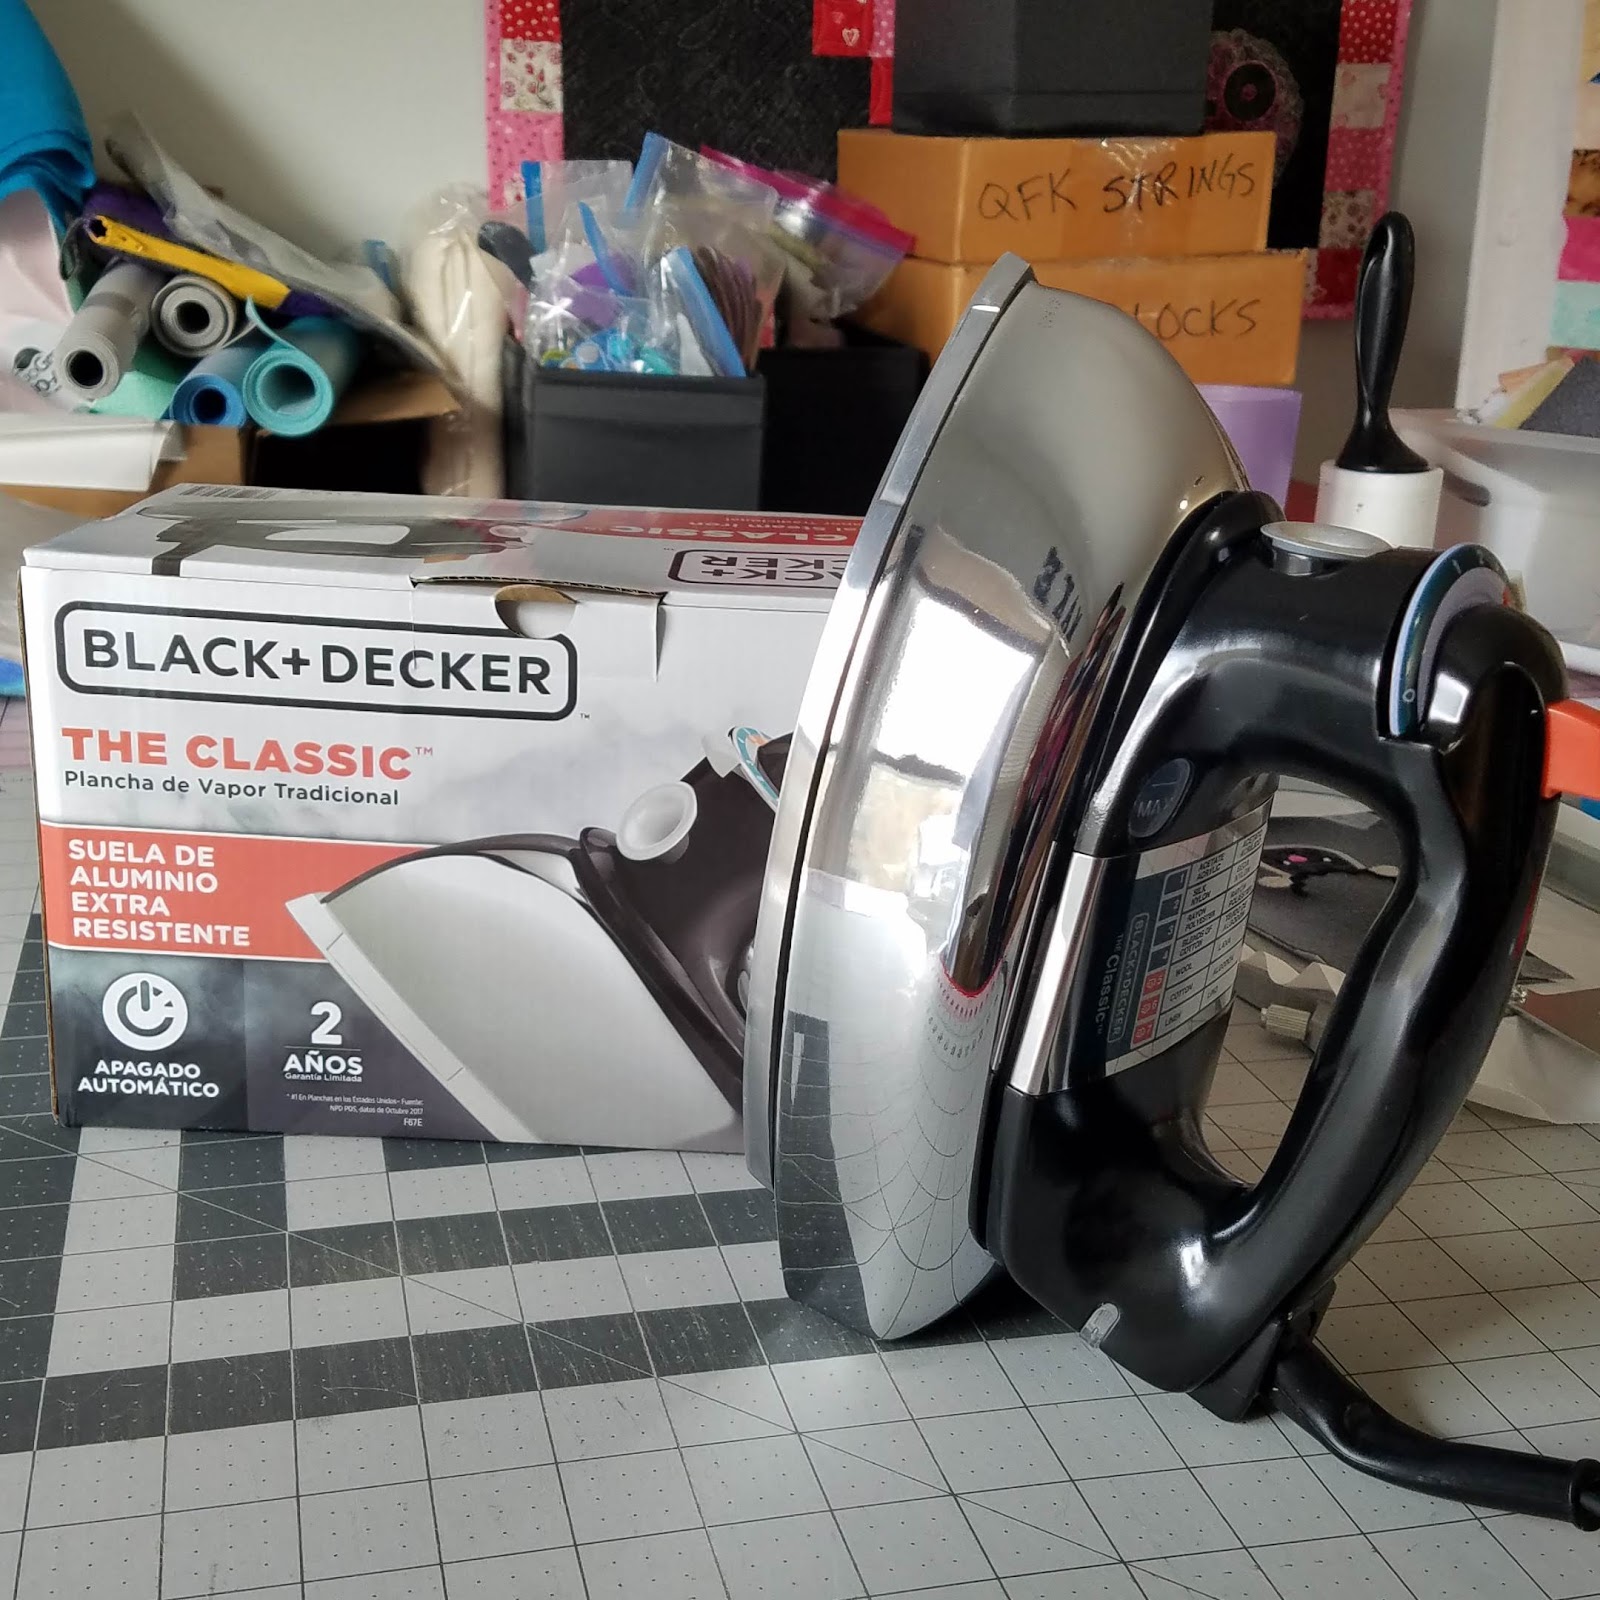
I've had the BLACK+DECKER Classic Steam Iron on my Amazon wish list for a while. I just didn't need a new iron so I kept using the BLACK+DECKER Vitessa Advanced Steam Iron. Sadly, the Vitessa had fallen on the floor (more than once) and the plastic cover for the water fill had broken off and had to be mashed into place every time I opened it to add water. It was finally time to order the Classic.
The reviews on Amazon were good, and the price point is more than reasonable (less than $30 as of publication of this post).

What I want in an iron:

  • heat up quickly and maintain temperature
  • easily add water for steam
  • non-coated (no non-stick coating) or chrome sole-plate
  • won't break the bank
  • longevity
  • sturdy

How do these two compare?
The Classic is heavier than the Vitessa by about one pound. What does that mean? Well, to me it means the iron does more of the pressing than I do. I used it on several quilt blocks the first weekend I had it and it performed as expected. Good temp and steam. 

  • Vitessa weight: 2 lbs 5 ounces (including the cord)
  • Classic weight: 3 lbs 7 ounces (including the cord)

Overall, I'm pleased with the Classic (left). I'll likely put the Vitessa (right) away for when I need to lend an iron or take one to a retreat.

The BLACK+DECKER Classic Steam Iron is my new favorite. Do you have a favorite iron?

Irons I own and like (affiliate links):
BLACK+DECKER Vitessa Advanced Steam Iron
Panasonic Cordless Iron
Steamfast Mini Travel Steam Iron

Wednesday, November 28, 2018

Home Ownership

Home ownership comes with joy and challenges. A couple weeks ago was a challenge. The dryer (that came with the house) decided it didn't want to dry clothes any more. I could go into a long discussion about the basics of dryers and how a thermal fuse works, but if you really want to know, there is great information on Appliance Repair.net. Seriously, if you can follow directions and use a screwdriver you can fix quite a few things.

I even found this video that helped me test the operation of the dryer before I went out to buy a replacement thermal fuse.


The internet has made some things so much easier.
I know this doesn't look like much, but when you don't have the thermal fuse that goes on those two wires it's kind of a big deal. 
You can pick up a thermostat and thermal fuse kit at the local appliance parts place (about $30 what we did), or you can order the kit from Amazon (about $10 but it takes a few days). Before replacing the thermostat and the thermal fuse, we cleaned the dryer ducting from the machine to outside the house. We also vacuumed inside the machine to make sure there wasn't an obstruction. In hindsight, I should have replaced the flexible section of dryer ducting, but that's easy enough to do another day.
We stopped by the local home improvement warehouse to see if they had the parts kits (they didn't) and we could have picked up this steal of a used dryer for only $450, list price only $999!
So... home ownership can be a challenge. But, if you're will to put forth a little effort cleaning out your own dryer vent, and replacing a couple small parts, you can save a couple bucks, and you might still have time to go outside and play.

Monday, November 26, 2018

Mystery Quilt: Good Fortune

It's that time of year again! When Bonnie Hunter releases her yearly mystery quilt and the internet goes crazy with crazy quilters. Today I'm sharing my color choices (show below) and the progress I've made on the first clue.
This year, the quilt is Good Fortune. Head over to Bonnie Hunter's blog to check out the Good Fortune Mystery Quilt. There you will find all the details, such as the fabric requirements and the first clue. Don't dawdle, if you want to join in. The mystery quilt is only available for free for a short time. In February it will be removed from Bonnie's blog and likely appear as a standalone pattern or will be added to another book she's working on. You can also find loads of free patterns on the blog.
I've been cutting and sewing and pressing.
I even finished the first of many 4-patch units. This clue is the perfect unit to fit in between other projects you might be working on during the lead up to the winter holidays. I haven't decided what my next project is, but you can bet these little 4-patches will be acting as my leaders and enders along the way.

Tools and Supplies (affiliate links):
Creative Grids 6.5" x 24.5" Rectangle
Fiskars Rotary Cutter
Fiskars Self Healing Rotary Cutting Mat
BLACK+DECKER Classic Steam Iron
Grabbit Magnetic Pin Cushion
Fiskars 8-inch scissors
Juki TL-2010Q
Creative Grids 6.5" Square Ruler

Linking up with Bonnie Hunter's Mystery Monday Link Up. Totally go see what other people are making!

Friday, November 23, 2018

Charity Quilting

Last weekend I dropped off quilted charity quilts with the Annapolis Quilts for Kids and picked up some kits to piece.
These simple quilts are perfect when you need something to do but don't want do too much thinking. Lay out the squares and get sewing. This one is super fun with tossed minions. 
These buzzy little bees are pretty fun, too. Both quilted and ready to be trimmed.

According to EpochConverter I'm ahead for finishing one charity quilt per week for 2018.

2018 Charity Quilt Count: 52

Wednesday, November 21, 2018

Machine Embroidery Disasters

To be clear, these are not disasters. These are just little moments when crafting goes slightly sideways. You should expect them, and not let them bother you too much.
Even the best tools you can afford sometimes don't work out the way you want. This is the back of one of the many snap tab projects I've been working on. This is what happens when the machine decides the proper thread path isn't the way to go. This was a simple fix, once I realized I had a problem. Remember, if you every have this sort of mess on the back of your work, the most likely cause is that your machine is no longer threaded correctly. All those twists and turns are there for a reason. Another possibility is that there is something hung up in the thread path that's affecting your tension. Re-threading is always a good first step.
This one was more of an operator error. I guess when I picked the color for the eyes I made a poor choice. In the end, these turned out fine, but only if you're expecting emerald eyes on your sugar skulls. I'm still learning the best way to set up the colors before stitching.
I've discovered that these mistakes and technical problems become slight overhead costs. I figure about 1 in 10 things doesn't turn out the way I intended. This isn't disastrous, just something I need to take into consideration. These snap tabs turned out just right.

Tools (affiliate links):
Magna-Glide bobbins
Fiskars Curved Craft Scissors
KAM snaps

Monday, November 19, 2018

Jewel Box Stars

Bonnie Hunter's 2018 leader/ender project is called Jewel Box Stars. This is a free pattern on her website. I've been working on this project for a few months now. If you want to learn about leader/ender projects, I highly recommend Bonnie's post about why you should add this to your toolbox.
I thought I had enough 4-patch and half-square triangle units to make my blocks. I found I was mistaken.
I was short about 14 half-square triangle units. I looked through one of my boxes (yes I have more than one) labeled 'batiks' to see if I could pull off a save. I happily discovered a stack of 5" charm squares which was perfect for my needs. I'm making my units finish at 4" by 4", so the 5" charms were a great discovery. I used some lights and darks to make a stack of half-square triangle units so I could finish up my blocks. This method isn't my favorite because of the need to sliver-trim, but if you want to make just a few it's perfect. I prefer to make my half-square triangle units using the 6.5" Easy Angle Ruler and strips.
When I was done with the blocks, I ended up with a couple extra, which is not unusual. Not all of them are perfect, so these few leftovers don't bother me a bit. The best part was that I had only one lonely 4-patch left over.
I joined four of the blocks into one big block. This block will finish at 16" by 16". Now, I only need to finish 29 more. This project isn't moving quickly but that isn't the point of a leader/ender project. I did swap the placement of units, but the stars will pop out when I have the rest of the blocks done.
I think I will make more progress when Bonnie Hunter's next mystery quilt starts next week. I haven't narrowed down my fabric choices, but you can be sure I'll be making some units along with everyone else, even if I don't make the whole quilt. Or, I'll get really excited on Black Friday and run to the fabric store and buy a bunch of fabric in fun colors. If you want some great color theory tips for this year's mystery quilt, I recommend you check out String and Story's Quilt Cam with Bonnie.

Tools (affiliate links):
Creative Grids 6.5" x 24.5" Rectangle
Fiskars Rotary Cutter
Fiskars Self Healing Rotary Cutting Mat
BLACK+DECKER Vitessa Advanced Steam Iron
Grabbit Magnetic Pin Cushion
Fiskars 8-inch scissors
Juki TL-2010Q
6.5" Easy Angle Ruler
Tucker Wing Clipper Ruler
Creative Grids 6.5" Square Ruler

Friday, November 16, 2018

Embroidering the Holidays

On Monday I shared my post about embroidering these felt place mats.
I got busy with the machine embroidery and stitched out a couple more. 
I think this one is going to work with me.
I'll hang it on my office door so everyone knows my opinion on the holidays. 
Here is the full set. Two red and two green. I think we'll hang them in the windows after Thanksgiving.

Machine embroidery designs by Urban Threads Embroidery.

Tools (affiliate links):
Magna-Glide bobbins
Fiskars Curved Craft Scissors

Wednesday, November 14, 2018

Snap Tab Crazy

I've been stitching up more than a few snap tab designs. This fun little floppy disk design is from Designs by Little Bee. See those little curved craft scissors? I bought those to make applique easier and I'm so glad I did. Each of those little labels is a piece of felt appliqued onto the tab. I am really pleased with the finish.
I made a couple more large hand sanitizer holders with the baseball design. I like how this one finishes up. The one with the teal outline is what happens when you trust your embroidery machine to do its own thing. I guess I'll have to give that one away with a hearty "I'm sorry it sucks."
After the floppy disks, a friend commented that people under 30 years old wouldn't know what those were so I made some Pokeball snap tabs. Many of those young people grew up watching Pokemon and playing Pokemon on Nintendo systems.
Skulls! Everyone loves skulls.
The downside is that my space ends up looking like a disaster area. So many things and ideas and so little time. It's great fun making that mess, though.

Tools (affiliate links):
Magna-Glide bobbins
Fiskars Curved Craft Scissors

Monday, November 12, 2018

Embroidering the Holidays

The last time we were at Target we saw these felt place mats. Darling Husband thought they would make great holiday decorations with the addition of some seasonal embroidery. I pulled up my collection of designs from Urban Threads Embroidery and got stitching.
I will be stitching out several designs, with no two being the same. When you collect designs you want to use them all.
These designs are big and take what seems like forever to stitch out. The results are great, though. I have two more to embroider.

Tools (affiliate links):
Magna-Glide bobbins
Fiskars Curved Craft Scissors

Friday, November 9, 2018

Charity Quilting

The latest charity quilt is this great scrappy hashtag quilt. This one was pieced by another member of Annapolis Quilts for Kids. If you would like to make one of these, there are loads of tutorials out there on the internet.
 I loaded it up and quilted it using a meander.
This is the stack that will be headed to the next meeting of the Annapolis Quilts for Kids.

According to EpochConverter I'm ahead for finishing one charity quilt per week for 2018.

2018 Charity Quilt Count: 50

Wednesday, November 7, 2018

MQG Pouch Swap

The DC Modern Quilt Guild and the Baltimore Modern Quilt Guild are doing a bag swap at the next Baltimore MQG meeting.
As one would expect, partner assignments went out weeks ago and I just got around to constructing my swap bag. The recommended pattern was the Open Wide Pouch by Noodlehead. It's a free pattern with a great tutorial. I dug around in my stash for the appropriate colors. At least I hope they are the appropriate colors.
Then I fiddled with Electric Quilt 8 until I had design I liked. The block finishes at 12" by 12" so I can quilt it and then trim it to the right size.
I decided to make a couple stacks of flying geese. The tools I used are listed at the bottom of the post.
I pieced the panels after fussy cutting the background pieces. All that fabric going in the same direction is such a happy thing!
I dug around until I found a leftover piece of batting and got it loaded on the long arm. While this might seem a silly thing to make with the long arm, I have to admit I love the results. I'm just a better long arm quilter than I am a free-motion quilter on my domestic machine.
Aren't those panels fun?
I changed my mind on the zipper color, and I'm really glad I did. This is a much better choice than the blue one I had picked out early in the project. This is one of those projects I would love to keep. That happens way more than I ever thought it would. I hope my partner will be as happy with it as I am.

Tools (affiliate links):
Creative Grids 6.5" x 24.5" Rectangle
Fiskars Rotary Cutter
Fiskars Self Healing Rotary Cutting Mat
BLACK+DECKER Vitessa Advanced Steam Iron
Grabbit Magnetic Pin Cushion
Fiskars 8-inch scissors
Juki TL-2010Q
6.5" Easy Angle Ruler
Companion Angle Ruler
Tucker Wing Clipper Ruler
Creative Grids 6.5" Square Ruler
Electric Quilt 8

Monday, November 5, 2018

Spooky Embroidery Continued

I know I keep sharing this project, but I'm not stopping until it is done and it still isn't done.
This past weekend I managed to get a couple steps closer to done. The collar was a real challenge. This is the first time I've made a collar like this and I learned a thing or two along the way. Mostly, I learned that the directions for this coat aren't really intended for "advanced sewists". They are intended for people that have made this style of coat before. So many steps, or images, are just not in the directions. 
I managed to get the collar constructed, though it wasn't as straightforward as I thought it would be. Very fiddly. My iron and the pressing cloth had a real work out. 
The embroidery placement on the sleeves turned out great! I think I need to make something with simpler construction (like a fleece jacket) and add some awesome embroidery. 
The coat front embroidery is mostly covered by the collar, but I think that makes it a little more subdued, so still a win. I have to finish attaching the lining, sew on the sleeve buttons, stitch the button holes onto the coat front, and attache the coat buttons. Plenty left to do, but I can almost see the end from here.

Tools (affiliate links):
Creative Grids 6.5" x 24.5" Rectangle
Fiskars Rotary Cutter
Fiskars Self Healing Rotary Cutting Mat
BLACK+DECKER Vitessa Advanced Steam Iron
Sleeve board
Grabbit Magnetic Pin Cushion
Fiskars 8-inch scissors
Juki TL-2010Q

Friday, November 2, 2018

Charity Quilting

Quilted a couple more charity quilt. First was this fun one with aliens. 
The second was this one with puppies. Both of these were pieced by Mary, another member of Annapolis Quilts for Kids. The humble meander is such a great way to quilt these fun quilts.

According to EpochConverter I'm still on track for finishing one charity quilt per week for 2018.

2018 Charity Quilt Count: 49