Wednesday, May 30, 2018

Coloring Yarn

I was a little surprised when I looked over the blog history to find it has been almost two years since I dyed yarn. I guess it was time to dye some more.
I take a stay-cation around this time of year. Not because my birthday week is a grand thing, but because I don't think I should have to work on my birthday. I don't think anyone should have to work on their birthday. Take a long weekend, at least! You deserve it for surviving another year. At any rate, that's why I had an entire Tuesday to spend coloring yarn with my yarn friend. I bought some fingering weight superwash yarn from Knit Picks a couple weeks ago to be ready for this fun. This is Bare Stroll Fingering, which is a great base if you like to knit with fingering weight yarn. We also had a few hanks of Bare Stroll Glimmer, which has a little Stellina to make it sparkle.
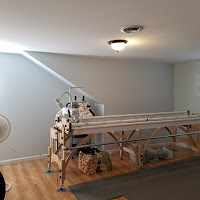
To prepare for long color runs I cake the yarn before making my knit blanks. Ball winder from Knit Picks, yarn swift from Knit Picks, Addi Turbo knitting machine from Amazon
This yarn was dip-dyed using PAAS Easter Egg coloring kits. I used two kits, so two tablets of each color, six colors total. Total yarn colored: 200 grams. I also used Wilton Icing Coloring set to get some really fun colors. Working with food-safe dye is something I learned watching ChemKnits on YouTube. It is possible to use your kitchen tools to dye yarn without worrying about poisoning your dinner.
This amazing green and bright fuchsia was achieved using Jacquard acid dyes (these are not food safe). You might not be able to tell in this photo, but that is glimmer yarn. 200 grams. 
This is one blank I colored for long color runs. This isn't the first time I've done this (go back to that post from 2016) but this time I used 300 grams of yarn and nine colors of different length runs. This was done using Jacquard acid dye.
I wound it up so you can see the color runs getting longer and longer. This photo is a little washed out, but I really think the project I have planned for this one is going to be great! If I do this again I'm going to plan my colors more carefully, and try to get some more variety. 

At the end of the day I had 1500 grams of freshly colored yarn hanging in my bathroom. I can't wait to cake it up and get stitching!

There are several different dye techniques you can use on natural fibers. I recommend you do some research to decide which is best for you. Dye kits: Greener Shades Acid Dye - available from Knit Picks and Jacquard Acid Dye - available from Knit Picks

I use a multi-level steamer (dedicated for dye use only) similar to this one to heat-set the colors.

Monday, May 28, 2018

Scrap Happens 2018

I have several bins full of fabric scraps, little blocks, and even big blocks. Sometimes the bigger blocks come from testing a new-to-me block or construction method. Sometimes I make more than a couple blocks for a bee and hold back the few that don't make the cut. Other times, I just make too darn many blocks. When the bin has enough blocks, it is time to make another quilt. 
This is another of those quilts. There isn't a real rhyme or reason to layout. I try to match up elements to make interesting things. Like that big orange diamond. 
I decided it would be a great time to use up a bunch of leftovers of wide backing fabric, too. I used three pieces to make this backing. This is how I measure my backing to make sure it is big enough for my quilt. I fold the backing into quarters (fold in half, then fold in half again) and do the same with the top. Place the folded edges of the top on the folded edges of the backing and make sure you have enough all around. I like to have at least 6" on the sides (for the long arm clamps) and at least 3" at the top and bottom (for pinning to the long arm frame). This backing was actually much bigger than I needed but I didn't trim the excess until after quilting. It is so much harder to add to a backing once it is on the frame than it is to trim after the quilting is done. That remaining strip will find its way into another quilt. 
I quilted with mostly swirls. This kind of quilt doesn't lend itself to fancy quilting. This quilt is destined for the travel trailer, so fancy isn't important. There is one mediocre feather in there somewhere. 
Almost every year I make a quilt made up of leftover bits and blocks. Sometimes they're even called Scrap Happens. The only way to tell them apart is the date. 
Even the binding came out of the bind of leftover binding. Making this a real scrappy masterpiece.

And that bin of 12" squares? Yeah, only about halfway full now. I need to get to work on some more scrappy blocks!

Other scrappy masterpieces:
Scrap Happens (2009)Scrap Happens 2012 and Part 2 of Scrap Happens 2012Scrap Happy (2013)Scrappy Stars (2014) Scrappy Bee Blocks (2015)
Scrap Vortex (2015)
Stringing Along (2017)Sparkle (2017)

Friday, May 25, 2018

Studio Lighting Upgrade

The overhead lighting in my studio was less than optimal. It was a smart bulb, but not a very bright one.
This is about the best it would get. Come evening, it was a struggle.
My Darling Husband bought me a smart fixture. The Haiku Home Premier light has a remote, is compatible with Alexa, has adjustable intensity and color, as well as a motion sensor.
Overall it is a great improvement over the last fixture and lamp.
                                 
Here they are side-by-side. Come evening, I'm sure I will appreciate it even more. Installation was super quick and easy. It took longer to find the right breaker than it did to install the fixture.

Wednesday, May 23, 2018

Delicate Elephant

Sometimes I get a crazy idea. This time, it was to use some denim I have had for a couple years, a fun embroidery design from Urban Threads, and my own cross-body bag pattern, to make a fun bag.
I picked the colors based on the coordinating print I wanted to use for the lining and strap. The design is the Elephant from the Delicate Ones set from Urban Threads. This four-color design makes a big impact. The denim is a very pale blue; a color better captured in the next photo.
I should time myself making one of these bags. So I can give others an idea how long it takes. This was once I had the lining, outer pocket, and the strap ready to go together. 
This bag is a great size to carry more than your phone but not big enough to carry the kitchen sink. I think this one will make a great gift.

9" and 12" zippers were purchased as matched set from ZipIt Zippers. Seriously, I don't buy zippers from anyone else unless I cannot wait for the quick shipping provided by ZipIt. Great prices and so many color options.

Monday, May 21, 2018

Batik Curve

The April Get It Done UFO Challenge was my take on improv curved piecing. I managed to finish the top in April, but didn't get a chance to buy backing to finish the quilt until May. I had a random vacation day last week and used it as an opportunity to head over to Spring Water Designs to pick up backing fabric. They have an excellent selection of wide backing fabrics.
I loaded up and got stitching.
The improv piecing didn't lend itself to very specific quilting, so I went with swirls and waves. The texture is going to be spectacular.
Here is a look at some of those swirls from the back. This is my favorite kind of quilting. Just quilting to fill the space with texture.
A close-up of the front.
I grabbed my leftover batik binding bits, added a couple more strips, and had some fun scrappy binding. I accordion fold the binding so it doesn't get twisted up like it does with winding it up like on a spool.
Bound and done, that's a finish!

If you don't know how batiks are made, I recommend you check out this YouTube video about the batik process. Making this fabric is very labor intensive. The last step is one I always point out to other quilters. To remove the wax the fabric is placed in near boiling water. It is very unlikely there is any unfixed dye still hanging around in a batik after the final manufacturing wash and rinse. This is one of the reasons I don't pre-wash batik fabrics. To be honest, I no longer pre-wash any fabrics. I like to liver dangerously.

Friday, May 18, 2018

Pool Removal

When we bought this house we knew the pool would have to be removed. This is the year we finally got the job done. The cover was getting pretty rough and we couldn't put it off any longer.
We uncovered the pool to see how bad it really was.
There was quite a bit of damaged tile. More than a few frogs, too. I caught three frogs during the draining process. I was going to remove them to an area behind the neighborhood with a slow moving creek. Two of those three frogs decided to make their own way in the world.
This happy fellow stayed in the bucket long enough I could deposit him in the real wilds of my neighborhood.
The contractor made quick work of draining the water from the pool and the hot tub.
Once it was drained, the real work could continue.
They broke up the bottom of the pool to make sure it wouldn't hold water any more.
They broke up a bunch of the concrete and filled the hole. 
This process took several days. 
Finally, they had the concrete apron removed and the pool demolished about 2 feet below the level of the yard. Now all that remains is the job of putting down grass seed. The yard is so much better without that giant hole in the middle.

I know there are people out there that won't understand why we decided to remove the pool. The truth is we don't want to pay for the upkeep of a pool (it is expensive and time-consuming). Realtors will tell you there is no resale benefit to a pool. It's just another mechanical system you have to maintain. That giant slab of concrete reflecting heat into the back of the house isn't very good for my air conditioning bill, either. A big yard is a better deal any day.
If that doesn't convince you, here is a dog. This dog would rather have a big yard to run and play in than a pool any day of the week. A pool is just a hole in the ground the ball gets stuck in and that is no fun at all.

Wednesday, May 16, 2018

Charity Quilt

I needed something to do to feel productive so I worked on this simple charity quilt for Annapolis Quilts for Kids.
It's quilted and just waiting to be trimmed and bound.

2018 Charity Quilt Count: 28

Monday, May 14, 2018

Get It Done UFO Challenge 2018 - May

This is the next installment of the Get It Done UFO Challenge 2018 for May.
Number 3 is the Quilter's Quest quilt from 2014. It keeps showing up on this list and doesn't seem to get finished. The top was finished in 2014 but kept waiting to be quilted and bound.
The top was finished in 2014 but kept waiting to be quilted and bound.
Step one to get a quilt quilted is to get the label stitched onto the backing fabric. This is my favorite way to label a quilt. It isn't a quick process, because I have to design the label, transfer it to the embroidery machine, prepare the fabric for hooping, stitch out the label, and remove any stabilizer from the back of the fabric. This is something that I often forget to plan for, but this time I got it stitching while I was quilting a charity quilt. I think labels are just as important as cutting, piecing and quilting.
This one isn't a big quilt. I'm thinking it comes in around twin-sized.
I quilted swirls in the background fabric.
And these petals in each of the geode spaces. The background quilting makes those petals pop.
I always match my top and bobbin threads. In this case I used a light gray thread for both the top and bobbin. This means the quilting shows up very clearly on the dark blue paisley backing fabric.
The binding was made with leftover coordinating strips and a couple strips cut from the background fabric. I just love a scrappy binding. I didn't use all of the binding I made. Most of the dark purple didn't make it into this quilt.
The pattern is called Geodes and is from The Scrappy Apple.

It is so nice to have another finish.

Friday, May 11, 2018

Knitting Update - Dotted Rays

Nothing says welcome to Maryland Sheep & Wool like casting on a new shawl. This time I pulled together 50 grams of fingering from Marigoldjen (I bought it last year and didn't use it up) and a couple cakes of yarn I dyed (in 2016) using food coloring.
I'm working up another Dotted Rays Shawl by Stephen West. Why do I keep picking this pattern? because I like how different yarns can really make an impact with a simple pattern. If you want to try your hand at this, or any of Stephen's other designs, West Knits is having a sale in their Ravelry store. Check out the West Knits Facebook for more information and to get the coupon code to save 25%.
I started this on Saturday, May 5th, and I'm making great progress. Though, as I go along those rows will get longer and longer. I have no idea how this is going to turn out, but I'm really pleased with it so far.
I think I am a little over halfway through the first cake of yarn. The stripes of colors will get narrower as I go along but that just adds to the fun.
This green is so much fun!