Showing posts with label stash. Show all posts

Monday, May 16, 2022

Make May Modern

Last Saturday the Baltimore Modern Quilt Guild held their Make May Modern one day retreat. I didn't attend in person but they encouraged everyone to make a tote using the Ruby Star Society Reusable Shopping Tote pattern (free). Since I didn't attend I decided to at least sew along with part of my day and make the tote. This fabric has been in my collection for more than five years. I'm pretty sure it came to me as a mystery box of quilting cottons from Craftsy. Large prints almost always become totes or bags because I don't have much luck cutting them up for quilts. 
This little pattern has you measure for your cutting lines. I used my Creative Grids Circle Savvy 11-3/4in x 18-1/2in Quilt Ruler to cut the curves. I use the Fiskars Stick Rotary Cutter, 28mm to cut those arcs.
I cut the pocket a little bigger than the pattern asked for. 
I used the serger to tidy up the straps before folding and top stitching. This pattern uses French seams but doesn't make it sound complicated. 
It does fold into the pocket. Not that it I managed to fold it to look pretty. Usually I fold my totes so they are tidy but this is the first time I've made one with a pocket specifically for the task. 
Overall this was a great afternoon project. I don't think this bag will become my go-to bag as it does have some waste. I might use some of the techniques on other simple totes, though. It does have a very professional finish. 

Monday, March 7, 2022

Effortless Twin Pouch

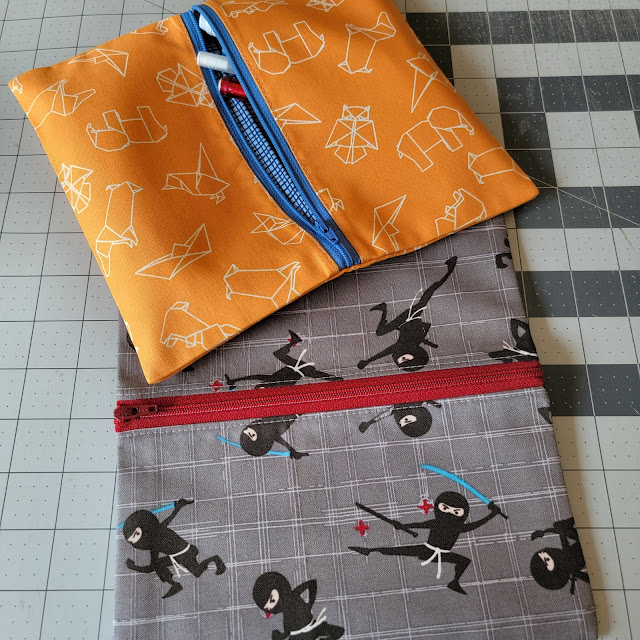
Spencer Ogg recently posted a free tutorial to make the Effortless Twin Pouch. A friend of mine is a big fan of their patterns. I learned about this tutorial through the Facebook Spencer Ogg Bag Sewing Group. I popped over to the site and checked it out. 
These are my fabrics for the two pouches I made. 
Zippers are from ZipIt on Etsy. Excellent selection and service. My favorite source for zippers in an amazing array of colors and sizes. 
This is a great little project that uses about one fat quarter worth of fabric and a coordinating zipper. I think it would make a great add-on for swaps. I've already filled the orange one with my pens and pencils to tidy my desk. I'm sure it would hold your sketching supplies, or colored pencils, for art on the go. 

Wednesday, February 23, 2022

Quilted Vest

I keep seeing people and their amazing quilt coats made from quilts. Sometimes the panels are designed and quilted instead of being cut from a quilt. Either way, the results really speak to me. Like all things creative there is some discomfort for some people about cutting up a serviceable quilt to make a coat. I'm sure people have their reasons. I'll point out an exchange I had with my darling husband to illustrate.

While discussing the issue, I said to a friend "They don't realize how many quilts I have."
 
"No one does." Added my husband. 

And that is mostly true. I could count them. But I would rather make more quilts. And that is where we run into the idea that there is nothing wrong with cutting up a perfectly good quilt, or making quilted pieces, and constructing a coat, or vest, or pot holders, or whatever you fancy. Many people quilt for the love of quilts, and their construction. Not all of these quilts will make it into a museum, and many won't. Some will be used and loved until they fall apart (this is what I hope for every quilt I make). Some will hide away in the closet for... I'm not sure what. Perhaps they wait for my inevitable demise. I hope when that happens, if I still have quilts, everyone that comes to remember me takes one away with them. And uses it until it is in tatters. For every quilt deserves to be loved like that. Loved to bits. 
For my first quilted garment, I decided to quilt up a solid fabric using a great edge-to-edge design called Gridlock from Longarm League. I bought this design to finish my Assemble! quilt and I liked it so much I thought it would be perfect for this gray fabric. 
I used some leftover blue flannel I had hanging around for the other side. I also used up a bunch of bobbins with mostly matching thread while keeping the top thread constant throughout. 
I used a great free quilted vest pattern from Purl Soho to cut my vest. I lengthened the front hem a little to make the bottom hem even all the way across. Squaring corners is easier for me than those curves.  
Here are my pieces. I chose a dark purple with cross-hatching to make my bias binding. 
It was a slow assembly process. Meaning I would sew a little and then move on to other things until the following week. 
I finished up all the edges with my overlocker/serger before assembly.  
I mostly wanted to keep the mess down while I worked and to have the inside edges clean so I didn't have to apply binding to them.
I was not looking forward to finishing the arm holes. 
In the end they weren't so bad. Maybe not perfect but finished. 
There was some wrestling of the vest but it turned out much more neatly than I expected. 
I added the label and sent it through the wash. 
I'm almost embarrassed to show it now that it has been washed. Of course it will need to be washed at some point. On the other hand. I like the crinkly quilt look. It also softened up nicely. I'm sure a couple more trips through the wash will make it even more snuggly. 
There are a couple things I will do differently on the next quilted garment. I'll be sure to share. 

Have you made a quilted garment? Did you make your pieces or cut up a quilt? 

Monday, January 17, 2022

Quilt Finish: Assemble!

I've had this fabric in my collection for a while. I knew it would become quilt binding one day. This past weekend was that day. I cut my strips and made that binding. The stripes on the fabric are not straight but sort of wavy. Striped binding is one of my favorites because it is just so much fun. 
Then, I attached it by machine and finished it with the machine for a quick finish. I rarely finish binding by hand any more. 
Second quilt finish of 2022. It took nearly a year from start to finish. Not because it was difficult but because I can't maintain focus on a single project to get it finished quickly. Buying backing slows things a bit, too. 

Learn more about the construction of this quilt in this post from April 2021.
Learn more about the quilting of this quilt in this post from December 2021.

Do you have a panel you aren't quite sure what to do with? I highly recommend Panel Pals from Hunter's Design Studio. This pattern (available both as a pdf download and paper pattern) will walk you through creating a pieced border for your panel and the addition of borders to bring that panel up to quilt size with great results. I even used techniques I learned in her book Quilt Talk to paper piece the corner blocks on my border. She is moving away from paper patterns so check out the deep discounts she has on paper products including an autographed copy of her book. 

Monday, January 10, 2022

Quilt Finish

I pieced the binding, put it into an easy to apply accordion fold, and got stitching. I used machine-finished binding for this one to finish quickly. You can see how I do that in my tutorial.  
That makes my first quilt finish of 2022. I have many more quilts that need finishing so this is just one of many. Have you made a list of things you want to finish this year? 

Wednesday, December 29, 2021

Assemble!

This quilt waited a silly amount of time for quilting. You can ready about the assembly of this quilt top in this post from April 2021. What isn't easy to see from this photo, is the quilting. Note: the quilt isn't crooked. My photography skills are crooked. 
I chose a light gray thread for the quilting. I chose the machine quilting design Gridlock from Longarm League
I love that the quilting shows up so well on the dark blue, outer border but is more subtle on the panel and flying geese border. I quilted this as an allover design. I haven't decided on a binding fabric yet. 

Wednesday, December 22, 2021

Long Arm Quilting

This poor quilt kit spent forever wanting to become a quilt. This past week I got one step closer to fulfilling that dream. I loaded it up and got quilting. 
I used this great edge-to-edge design called variety from Anne Bright Designs
It had swirls and flowers much like the border fabric and I thought it was perfect. With so many options it is nice to find the perfect one for a quilt. Now to trim it and get the binding attached.  

Friday, December 17, 2021

Fan Sewing

A friend introduced me to Spencer Ogg Sewing Patterns. I found a free tutorial for this cute little bag. You can find the details, and a link to a video on how to construct your own, on Spencer Ogg Sewing Patterns. I lined my bag using a hack shared on the Spencer Ogg Facebook Sewing Group. It is a little more challenging to get the lining in there but it is totally doable. It is a great size for short trips. Enough room for a water bottle, your hand sanitizer, phone, and wallet. 

Wednesday, November 17, 2021

Quilt Backing Fabric

Over the last year or so, I've been piecing quilts primarily from my collection of fabric. This is a great way to use what you have but I reached the point where the quilts couldn't become true quilts because I do not have a collection of backing fabrics. I stuffed these three quilt tops into my Spring Water Designs bag and headed out for backings. They always have a good selection of wide backing fabric. 
First was this kit quilt I made using a kit from one of the big box stores. The blue in the foreground is a fabric I found on the discount shelf. A great match. The cream print under the quilt top is the wide backing I chose for this one. Check out the full quilt in this post from November 2020.
This quilt top was made using the Florid Bloom template set and Double Wedding Ring Quilts book from Victoria Findlay Wolfe. This backing isn't perfect for this quilt but it was too great to pass up. Check out my Florid Bloom quilt post from September 2020 to see the whole quilt. 
This backing speaks to my love of busy backs and the colors couldn't be more perfect. Now to decide if I want to quilt this with red or blue thread. Check out my Assemble! quilt in this post from April 2021.

Wednesday, September 8, 2021

Am I Blue

I've been working on this quilt for a long time. This past weekend I finally attached the binding. 
I accordion fold my binding to keep it from getting twisted while I work with it. I know there are loads of tricks people use when winding their binding but this has always worked for me. 
Many years ago I switched from attaching binding by machine and finishing by hand to machine-finished binding. You can check out my binding tips and tricks. I work with 2.5" binding. This results in a wider finished binding (3/8") that I would get using 2.25" wide binding. Again, do what works for you. 
Now I finish binding almost exclusively by machine. I can quickly finish the binding and that means I can move on to new projects. 
I'm pleased with how this one turned out. 

Friday, January 29, 2021

Border the Blues

This week I managed to squeeze in a little sewing time. I finished sewing the blocks together. 
I also managed to attach one border. I have one more border to attach. Evening photos have such poor lighting. Sorry about the quality.  

Tools and supplies (affiliate links):

Monday, January 25, 2021

The Blues

I've been working on this one for a while but picked it back up this month. 
I'm almost ready to join the rows and add a couple borders. This part of the quilt is about 72" by 72". Stay tuned to see how this one finishes up. 

Tools and supplies (affiliate links):

Wednesday, January 6, 2021

Picking Up the Pieces

Sometimes a project will get set aside. 
I'm not even sure when I stopped working on this quilt. It must have been at least a year ago. It was time to pull it out and make some more blocks. 
So much fabric and so many more blocks to go. I don't know if I'll finish it this time around but it is nice to pick up the pieces and keep moving. 

Like batiks? Want to see another of my quilts made with batik fabrics? Check out this post from 2018. My Jewel Box Stars was made using a wonderful free pattern by Bonnie Hunter

Wednesday, April 1, 2020

Elvira Quarantine Quilt

I loaded up the finished Elvira Quarantine Quilt Along by GE Designs and got quilting. Yellow thread is one of my favorites for long arm quilting and it was perfect for this quilt. It blends in while lending texture. 
The pieced back worked out perfectly. This will make some little person so happy. Great for tummy-time when tiny and play when older. 
I can imagine little cars driving around those city streets. 
Polka-dot binding might be my favorite. A fun little pop of color. The best part about this project is that purchased no fabric or batting. This entire project came from my collection. I used my Jaybird Super Sidekick Ruler to create the 60 degree diagonal cuts for the blocks.

Tools and supplies (affiliate links):
Creative Grids 6.5" x 24.5" Rectangle
Fiskars Rotary Cutter
Fiskars Self Healing Rotary Cutting Mat
BLACK+DECKER Classic Steam Iron
Grabbit Magnetic Pin Cushion
Fiskars 8-inch scissors
Juki TL-2010Q
Cheryl Ann's Quilting Design Wall - 72" White